Fabulous Fava Beans

Fava beans are very versatile, they can go sweet or savory! They can be peeled, seasoned, and roasted for a crunchy road snack!
Vikings only had one real bean and that’s the fantastic FAVA! Add these buttery, flaky treasures to your dinner rotations today!
Ingredients
16 Oz dried fava beans
1 medium onion, chopped fine
1 sprig fresh sage (1 TSP dried, rubbed)
2 sprigs fresh thyme (1 1/2 TSP dried)
2 sprigs fresh parsley (4 TBS dried)
2 TBS lard (or butter)
24 oz beer
1 TBS smoked salt
Directions:
Soak the fava beans overnight in a gallon of water.
Clean the beans by making sure you get the hulls and floaters out.
Melt the lard in a large, heavy bottom pot.
Add the onions and herbs.
Cook until the onions get translucent.
Add in the beans, stir and coat well. Cover and cook for 5 minutes.
Add in the beer and salt and stir well.
Replace the lid and allow to simmer for 45 minutes. Do not let the pot run dry. Keep beer on hand to ensure this.
Material Culture
I’ve been thinking about material culture; Vikings vs. 21st Century.
I’m not usually one to automatically say “the old ways are the best ways'' indiscriminately. Some things are better, but definitely not all. I’m thinking about that whole material culture. For most of human existence, we haven’t had anywhere near the amount of personal belongings we do now. We have a plethora of hoo-has, totchkeys, knick-knacks, whatzits, and ding-dongs; so much so that we pay to store them and then forget about them.
What if we started going back to that model? What if we made a few shirts and pants out of quality fabrics and just used them? What if those of us who had the wherewithal to grow food, grew some? Not enough to feed armies, but just one person?
From the archaeological record, we have mostly trash, grave goods, offerings, and sacrifices to study. We don’t have the luxury of Pompeii-like excavations for the Viking age, so we get the far ends and all around, but not much in the core of homes, workshops, and common lives. We know from finds that anything that could be repaired, was. Anything that couldn’t be repaired was repurposed. Since most things were, by their very nature, biodegradable, not much survives of the material culture. So we study not only what we do have, but also what surrounding surviving cultures say about Iron Age Scandinavians.
With all of that reading, here’s what I came up with: Iron Age Scandinavians liked their bling, but with the caveat that they mostly made their own. Some of the more recent publications about our time period are coming out with detailed directions for making your own. I think in order for us to understand the material culture of our ancestors, we should make our own. Yes, I’d like for you to buy my wares, but ultimately I’d like for you to have valuable experiences.
To this end I’d like to issue a challenge: Make Your Own Gear. Do a deep dive into something you’d like in your kit and make it. If you don’t know how, find someone who can help. I can help with ceramics. I can teach via video feed to individuals or groups.
Good Feast!
Light A Fire In Your Belly!

Classes coming soon!
Want to learn how to cook over an open fire? How to manage your fire in a fire pit or a grill? Mixing and fixing in the old ways? I got you. I’ll be running a series of 3 live classes online via Google Meet at noon CST. I’ll do these first few classes on a donation via Paypal because this is going to be Beta testing of classes.
I’ll need the email addresses of folks who are participating in the live events. The videos will eventually go up on YouTube on our soon to be created video site!
I’ll also send out a list of materials you’ll need to follow along at home. Classes will happen on Jan 20, 27, Feb 3. Sessions will be about 45 minutes long with time for questions at the end.
Small table to hibachi style grill
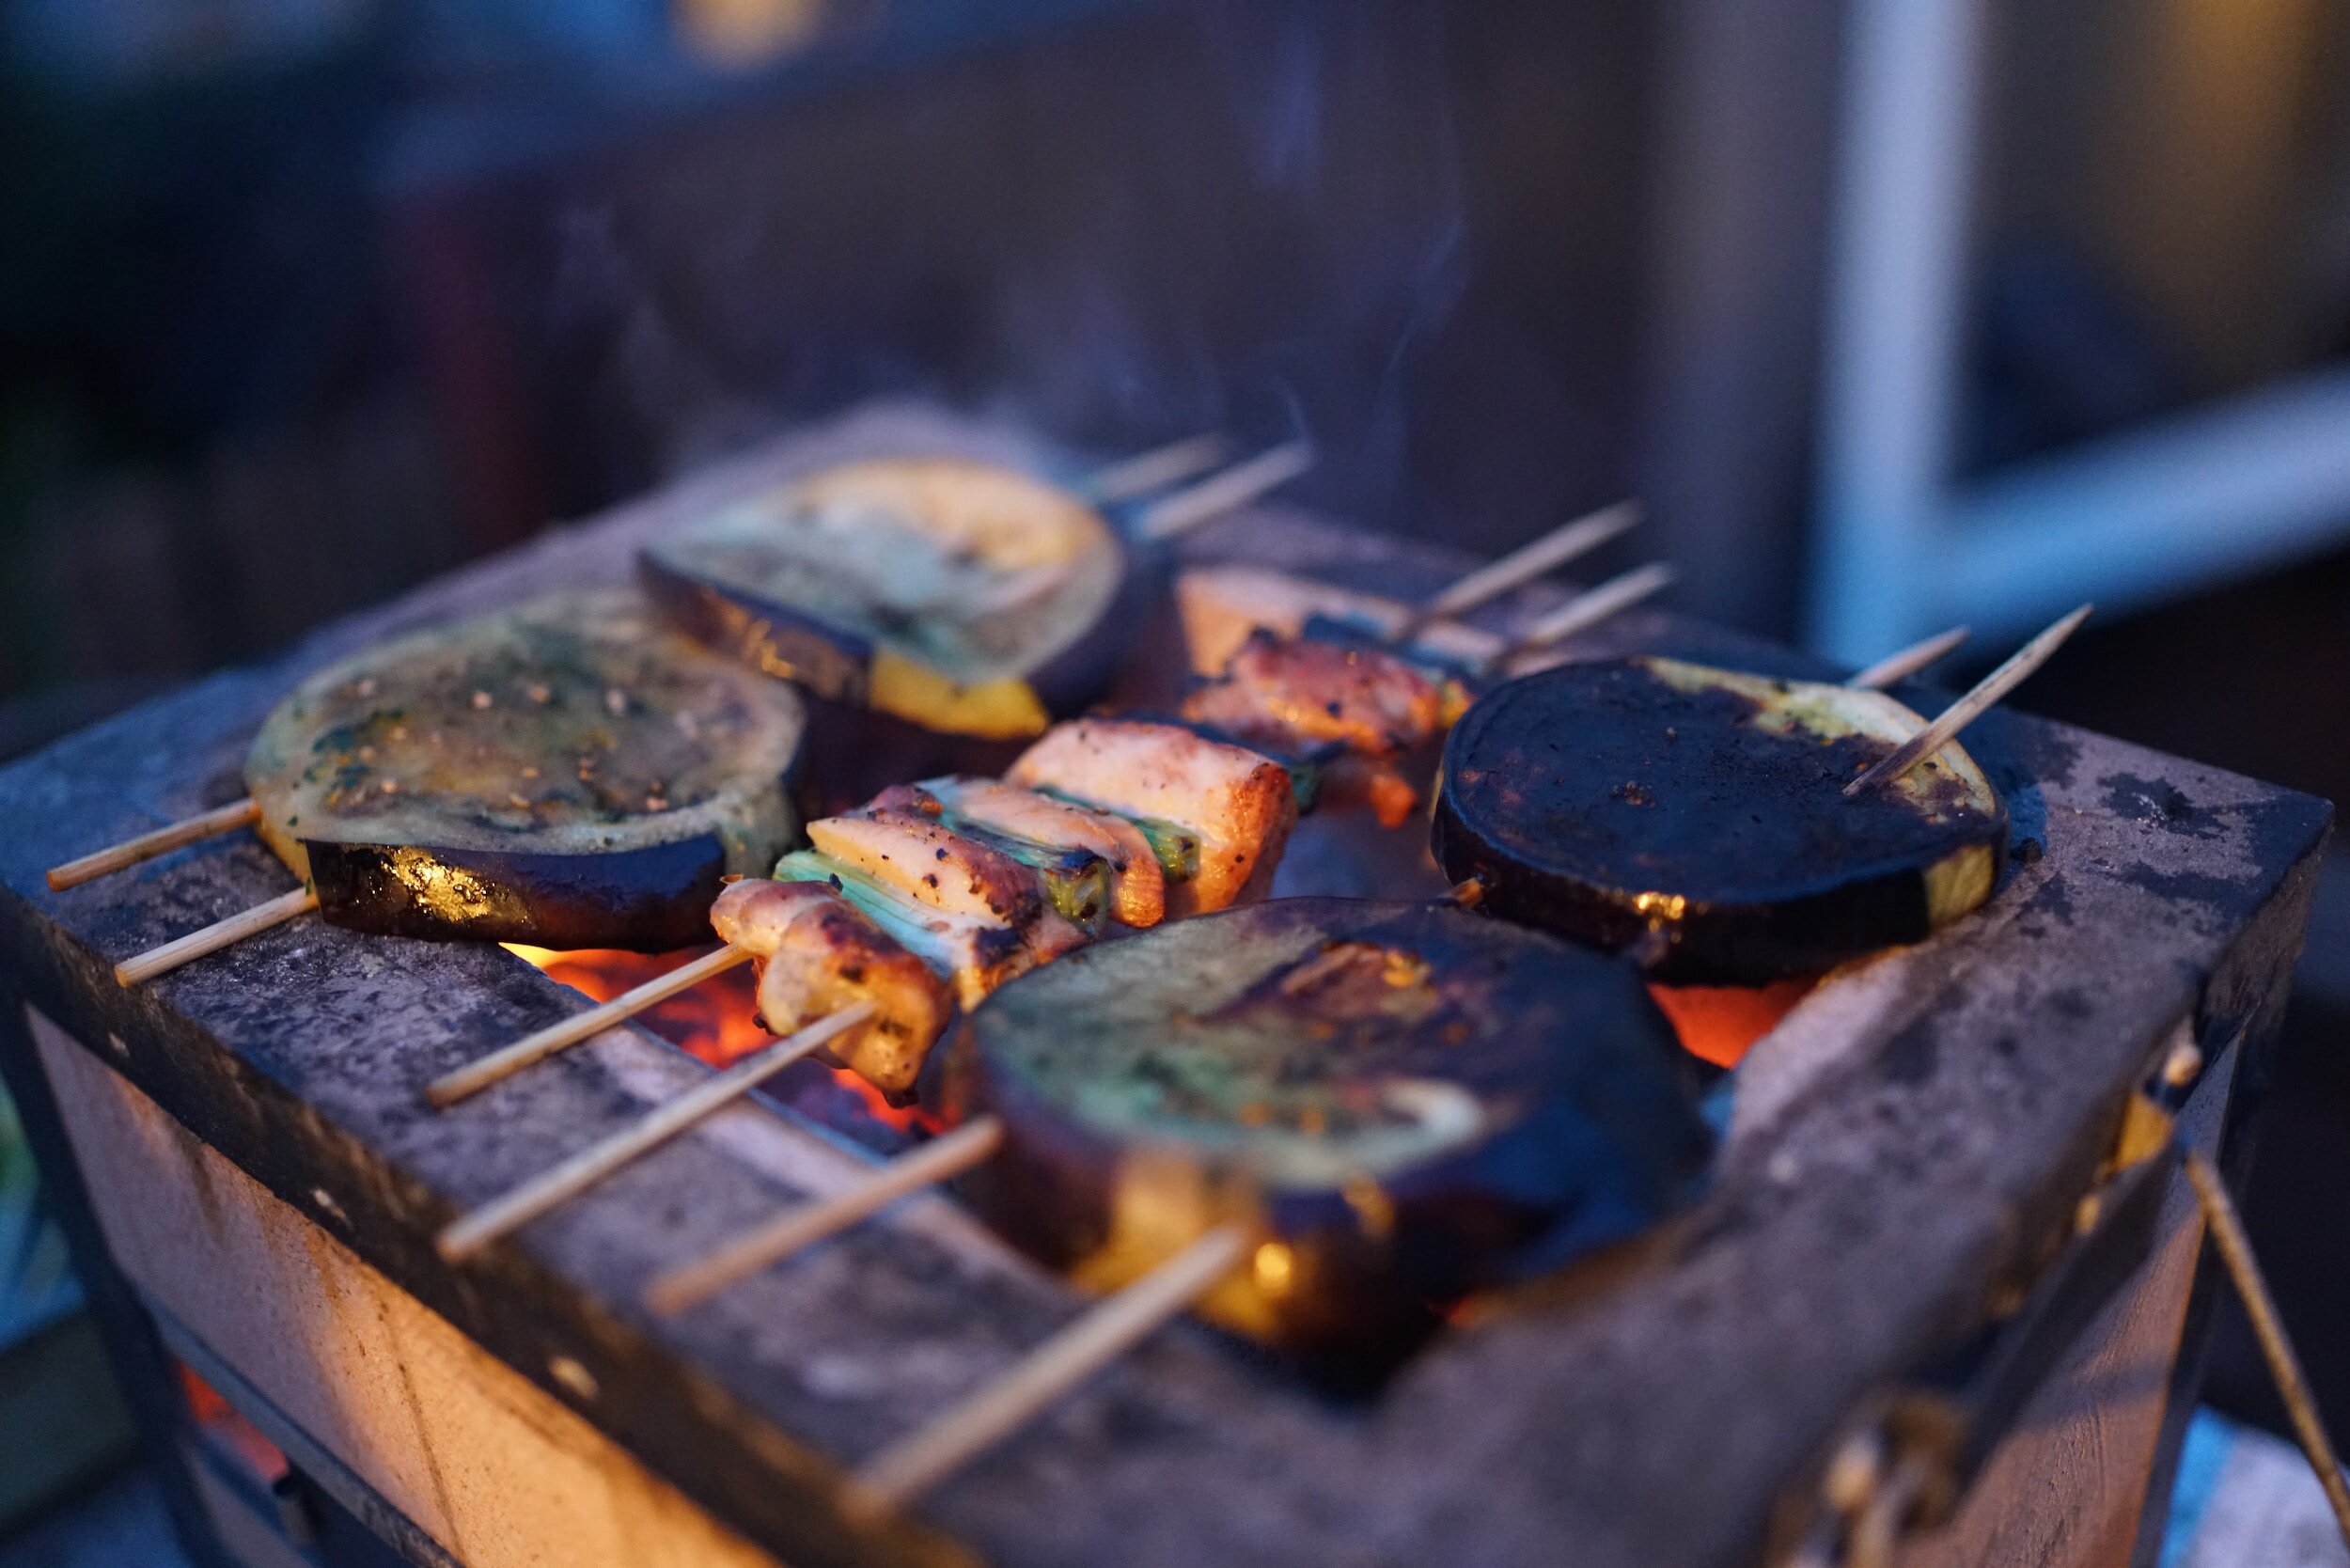
This isn’t bushcraft. It’s how to use fire to cook your food. I’m operating on the assumption that you have access to a grill or fire pit. Don’t discount a picnic table top hibachi grill, they can be very useful!

Fire pit in the big hall at Lijre.
Part 1: Set up yourself for success! Getting your gear and space set up.
Part 2: How to build and manage a cooking fire in a fire pit and a grill.
Part 3: How to use a fire to cook: veg, meat, container cooking
A Fire In Your Belly
Saturday 20 Jan
Part 1: set up yourself for success! Getting your gear and space set up.
Get out that rusty old hibachi you got in college! If you have a charcoal grill, drag it out! Got a fire pit? Dig it out! We’ll be cooking outside, so dress warmly! Any weather is outdoor cooking weather!
Materials you’ll need for three class sessions:
A charcoal grill (a little table top or hibachi grill is fine)
Lump charcoal (usually a 15# bag) regular charcoal works, too. Lump charcoal burns hotter longer per square inch of surface. Menards, Home Depot, Ace Hardware, Fleet Farm, and Tractor Supply have these.
Fatwood (a fire starting material not necessary, but really nice)
3 TP tubes filled with dryer lint (fire starting material)
Lighter or matches
Lighter fluid
Fire extinguisher (you need some in your house anyway)
Squirt bottle with water in it
2-3 bundles of firewood (if you have a fire pit)
Leather gloves or oven hot pads
Long tongs for charcoal
Fire iron and blow tube for fire pit (not necessary if you don’t have a fire pit or access to a fire pit)
Long tongs for food
Something to cook (something easy like brats or kebabs or veggies)
Some kind of table or work surface you can put some of your materials on; a folding table, picnic table, or a folding chair.
Bleach/disinfectant wipes
Topics:
Cleaning before-during-after
Getting your cooking area ready
Fire ingredients; O2, ignition, fuel
Flame vs. coals; How hot is it?
Fast or slow cooking: size does matter.
smoke ; what it means. Transparent, white, gray, black
Hot smoke vs. cold smoke
Time vs. patience
Got an emergency? Squirt bottles, sand, fire extinguisher.
Saturday 27 Jan
Part 2: How to build and manage a cooking fire in a fire pit and a grill.
Materials you’ll need:
Bleach/disinfectant wipes
The stuff from the first session
Something to cook
Topics:
Cleaning before-during-after
Building a fire about cooking, not entertainment.
Fire ingredients; O2, ignition, fuel
Daylight cooking is best
Grilling
Fire pitting
Cleaning
Saturday 3 Feb
Part 3: How to use a fire to cook: veg, meat, container cooking
Materials you’ll need:
A charcoal grill (a little table top or hibachi grill is fine)
Lump charcoal (usually a 15# bag) regular charcoal works, too. Lump charcoal burns hotter longer per square inch of surface. Menards, Home Depot, Ace Hardware, Fleet Farm, and Tractor Supply have these.
Fatwood (a fire starting material not necessary, but really nice)
3 TP tubes filled with dryer lint (fire starting material)
Lighter or matches
Lighter fluid
Fire extinguisher (you need some in your house anyway)
Squirt bottle with water in it
2-3 bundles of firewood (if you have a fire pit)
Leather gloves or oven hot pads
Long tongs for charcoal
Fire iron and blow tube for fire pit (not necessary if you don’t have a fire pit or access to a fire pit)
Long tongs for food
Something to cook (something easy like brats or kebabs or veggies)
Some kind of table or work surface you can put some of your materials on; a folding table, picnic table, or a folding chair.
Bleach/disinfectant wipes
Cast iron cooking pot
Ceramic cooking pot
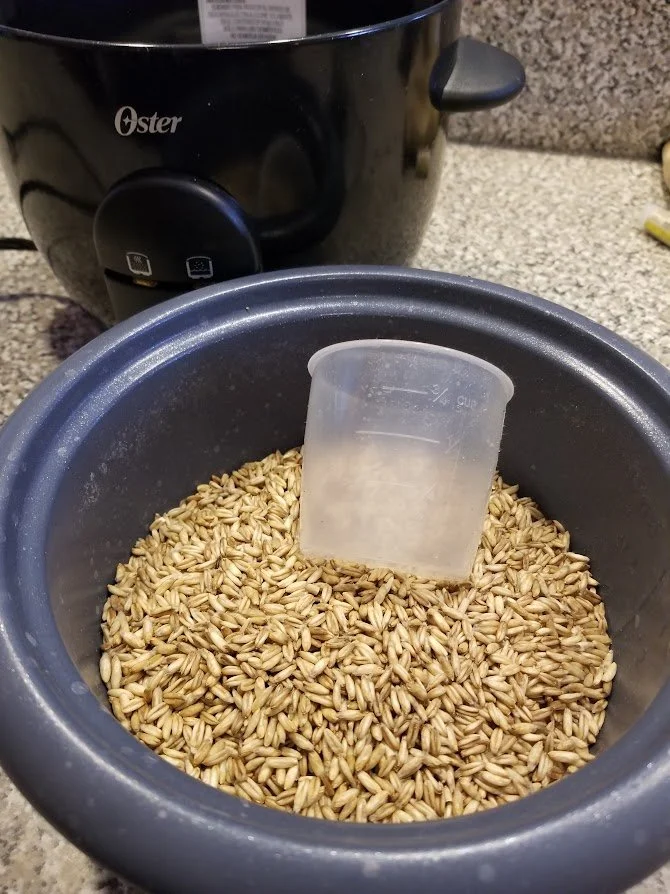
Recipe for Butter Barley
Recipe for Nutty Grain and Peas
Food thermometer
Topics:
Cleaning before-during-after
Making sure your fire is a cooking fire
Getting your cooking vessels filled
Placement of vessels by or on the fire
Checking your food
Adjusting your fire
Daily Viking Meals


Split yellow peas cooked in beer in my rice pot. It was excellent!
We’ve all heard of entire boars, goats, sheep, deer, and snipe roasting on spits over a roaring fire, heaping baskets of raised round bread, overflowing bowls of fruit, and a never-ending supply of Suttung’s mead. It's an epic image! It’s so Hobbity-Dwarifity Tolkienish, you expect a wizard to wander into the frame.
That’s not necessarily what happens. On fancy feast days, probably. On a regular Thursday, whether or not you have the hang of Thursdays, it’s probably a one pot meal.

This house has vents at either end and above the door for smoke and air, but not a lot of light gets in there. https://en.natmus.dk/historical-knowledge/denmark/prehistoric-period-until-1050-ad/the-viking-age/the-people/viking-homes/
Where you live shapes how you prepare your food

Lijre open air museum. That’s Daniel Serra’s hand! Smaller homes like this one were smaller farmsteads with one family, animals, storage, and any farm hands they had.
Iron Age Scandinavians mostly lived in longhouses or halls with extended family and servants. These were usually made of wood, stone, or sod with wood shingles, reed thatch, sod, or stone roof tiles. There are generally two exterior doors and a smoke hole in the roof. Some houses had more than one roof hole, some had a smoke exit at the top of the roof on either end of the hall.
These homes are not brightly lit. There aren’t a lot of windows. Windows are great for light and a breeze, but not particularly defensible. There is some evidence recently found that some of the more fancy, expensive halls had very small windows with glazing. These little windows were, it seems, more about allowing coloured light into a space than for looking out of.
There’s not a lot of indoor space. It is a very open plan with benches along the sides and a center hearth for cooking and heating. Humans on one end, farm animals on the other, and work space in the middle.
During the summer months, folk are outside doing farm work or other skilled labor like fiber, wood, ceramic, stone, and metal fabrication.
These folks were BUSY! Between all of the work to be done to make sure food, clothing, and shelter are to be had in the winter, common daily meals are going to be as easy and extendable as possible. I also want you to remember how dim these homes are. Lots of chopping, mixing, fixing, baking, sauteing, roasting, steaming, boiling, or any other kind of meal prep is going to be limited.

Cooking pot from the Iron Age collection at the Danish National Museum
Enter the ceramic cooking pot. You might know it as a Crock Pot. A ceramic cooking vessel that has low and slow heat over a long period of time. Yes, I know they didn’t have electricity, but they did have fire and ceramic cooking pots. It’s pretty easy to use your central hearth to bank up a fire and set a pot of cooking liquid, grain, herbs, and a little bit of meat to cook slowly.
Open hearth in the hall at Lijre, Denmark.
Dagmal (Daymeal)
This meal is usually leftovers from the night before and/or possibly fresh porridge. See my post on Porridge Power from 31 Oct.
Remember, folk are busy. Everyone has a job to do, probably many jobs. When it’s dark, it’s hard to chop, stir, and do all the things we are used to doing with our meal prep. There is a limited amount of oil for frying or sauteing; most fats used in cooking are rendered animal fat or butter. Sometimes there is whale oil. Any fat or oil has a wide range of jobs to do; sometimes not a food related job at all.
Nattmal (Night meal)
This is the big, fresh meal. Since you can start preparing it in the light hours of the day and let it simmer all afternoon, you can do the bulk of your daily food prep in daylight. This is also the big morning meal, so lots of this is made.
Snacks!

Snacks at the airport. I didn’t get them for the plane ;)
We can’t forget the ever present snacks. These are also excellent travel foods Dried meats, hard cheeses, nuts, dried plant matter (fruits, herbs, vegetables), rendered fat, crackers or “hard tack” <click-click>.
Snacks are just as prevalent today as they were then. Sometimes you need a snack to get you through the day. While Vikings didn’t have sugar and chocolate to prevent the hangries, there were plenty of snacks to be had. Folk living a very physical and outdoor on-the-go lifestyle need far more calories to maintain energy levels and body warmth than the more sedentary, modern folk we have morphed into.
Bibliography
Lover, History. “The Viking Diet- What Did the Vikings Eat?” Museum Facts, 7 Jan. 2021, museumfacts.co.uk/the-viking-diet/.
Natmus. “Viking Homes - National Museum of Denmark.” National Museum of Denmark, 2019, en.natmus.dk/historical-knowledge/denmark/prehistoric-period-until-1050-ad/the-viking-age/the-people/viking-homes/.
Weiss, Daniel. Vikings Had Glass Windows - Archaeology Magazine. www.archaeology.org/news/11788-231010-vikings-glass-windows#:~:text=The%20researchers%20believe%20that%20the,colorful%20light%20to%20filter%20in.
Good Feast!
Porridge Power
Winter is coming. You’ll need some porridge.
Porridge is, in its simplest form, a starchy grain boiled in milk or water until it’s thickened. It can be sweet or savory, herb laden and flavored with just about anything. It's easy to make, one pot, and easy to shop for. Thin porridge is gruel. No, not that kind of “Please sir, may I have some more,” kind of thing. Gruel is a thin, more liquidy version of porridge; still a grain and liquid base, but you end up adding more liquid and cooking it longer to break down the grains more. Further breakdown of grain can make it easier to eat and digest.
The basic recipe: Two or three parts liquid to one part grain. Different grains will absorb your cooking liquid at different rates. The ratio listed below is for raw, uncooked, unprocessed whole grains, not cut, rolled, or otherwise processed.
Oats: 3.5-4 cups of liquid per cup of uncooked whole oat groats
Barley: 4 cups liquid per 1 cup of whole uncooked grains
Millet: 2 cups liquid per 1 cup of whole uncooked grains
Rye: 4 cups of liquid per 1 cup of whole uncooked grains
Wheat: 4 cups of liquid per 1 cup of whole uncooked grains
Buckwheat: 2 cups of liquid per 1 cup of whole, uncooked grains
When cooking your grain, wash it first to get any extra dust off. Rinse it three times, scrubbing with your hands the first two times and a good rinse the third time. Much like you would for whole, unprocessed rice. If you use too much liquid or cook it for too long, your grain can get mushy. Part of the fun of whole grains is the texture!
Possible cooking liquids:
Water
Milk
Whey
Stock
Beer
Wine
Mead
One thing to watch with your cooking liquids; the thicker your cooking liquid, the more you have to watch what’s happening during the cooking. Slow and steady does the trick! You want the grain to be your desired texture, not underdone and not super mushy. Fluffy! All of these grains can be fluffy when you watch your cooking. Check your grain occasionally and give it a gentle stir or fluff. If you get really vigorous, you can mash up the grains and you’ll end up with a more gruel-like consistency instead of a nice, toothsome texture.
While you don’t have to babysit cooking grains, you do have to check them. A nice low temperature in a heavy bottom pot or a crock pot or a rice cooker is fine. This is a one pot deal! Porridge isn’t a fancy thing, but it is filling and comforting!
Vegetarian Viking
Did you know? Iron Age Scandinavians were predominantly vegetarian. It’s not because of any health reasons, but financial reasons. It costs a lot to raise animals for meat and then to preserve the meat. You want to stretch that out for as long as you can because you plan your food around an agricultural calendar; planting to harvest. Your best months for the greatest variety and amount of food is late summer into harvest season. That’s about a three month window. Most of the rest of the year you are eating from your larder.
Food doesn't magically arrive in spring. That’s the leanest time. You can harvest some of the early greens and start fishing as soon as the ice is out, but you are still utterly dependent on your winter stores.
Sweet vs. Savory
The next step is to figure out what direction you want to go with your flavors and textures. The only sweetener Iron Age Scandinavians had was honey or certain fruits.
Nuts? Don’t mind if I do! The most common and easily available nut is Hazelnuts followed by pine nuts. Walnuts are a distant third as they aren’t suited to growing zones that get below -30F in winter (World planting zones). That means very southern Sweden, Denmark and coastal areas up the Baltic. Research suggests Romans brought walnuts with them as they came through Europe. There is also evidence of walnuts coming through Belarus.
Dairy? Yes please! Dairy can include any kind of milk product from goats, sheep, and cows. Whole milk, buttermilk, butter, whey, cheeses both new (soft) and aged (it gets harder as it gets older as the moisture is leaving).
Seasoning is the act of adding salt and herbs to food to enhance the flavor of the porridge. Remember, porridge is all about the grain. That is your major ingredient. The next ingredient will be some salt. From that point, it’s really about anything you’d like to add, literally from Hazelnuts to walnuts and everything in between. Herbs like sage, thyme, and mint go very well together when balanced with a little Berry Vinegar, honey and dried fruit.
A bit dull? No worries! A bit of acid will sparkle it right up! A splash of cider or Berry Vinegar or even sour beer will change the flavor slightly! And don’t forget the butter!
Meat? Absolutely! Chop up cooked meat fine and toss it in for some excellent flavor!
Porridge FAQ
Yes, I hear your question in the back! Peas porridge! Yes! You can cook peas in this same way, but start with dried white, yellow, or green peas. A lentil is not a pea! The ratio is usually 3 cups of liquid to 1 cup of dried peas. The peas can be whole or split. If you want the pea to remain whole, cook for only about 20 minutes. If you want a puree, 40 minutes. Watch the liquid absorption. You can go from fluffy to burnt on the bottom quickly.
What about toasted grains? Absolutely! Toast grains in a dry, hot, heavy bottom pan. Keep those grains moving! They will start to toast and will burn quickly, so keep them moving and keep watching them. They will pop, but not big fluffy poofs like popcorn. Toasting them will cook them partially. If you are going to make porridge, have your cooking liquid handy so once 90% of your grain is popped, you can add in the liquid. I don’t recommend milk at this stage as milk can scald or split easily in a hot, dry pan.. Start with just water and then add milk as the pan cools. Allow to cook for about 10-15 minutes at a low simmer. Check it frequently and stir it gently.
Can I boil whole, uncooked grains in fat? Absolutely! Remember, the only fats available on a casual basis were rendered animal fat and butter. There isn’t a lot of evidence for nut or seed oils used in food production. That doesn’t mean it didn’t happen, but that there isn’t a lot of evidence of this activity. Here at MUVC, we are evidence and research based. I haven’t cooked these grains in fat, so I don’t really know how long to cook them for. I’d boil them in fat for a few minutes until they have absorbed the fat and started to pop a bit, then add a non-dairy cooking liquid very slowly down the side of the pot so the fat doesn’t splutter everywhere.
Bibliography
https://www.tandfonline.com/doi/full/10.1080/14614103.2022.2137648

Elegant Pillaging Party Menu
Pillaging in the schedule for this weekend? Don’t do it on an empty stomach! Call your friends and have a little dinner party before hand and coordinate!
Tender Oat & Walnut Flatbread
Stewed Elk with cherries
Leek & Pork Wraps
Fava Surprise
Tender Oat & Walnut Flatbread
Flatbread
2 ½ C oat flour
1 C plain skyr (or plain yogurt)
8 oz beer
1 tsp salt
Mix the dry in a large bowl, reserving ¼ C flour.
Mix the wet in another bowl and slowly add, mixing each time, to the flour bowl.
Add more flour as needed to make a soft dough.
Divide into 6 equal pieces and roll out thin. Set aside under a towel while making the filling.
Filling
8 oz soft cream cheese
4 oz plain yogurt
2 oz honey
1 C fresh or frozen blueberries (use them frozen)
½ TSP salt
1 C crushed walnuts
Gently fold everything but the blueberries and walnuts in a bowl. Divide into 6 portions
Lightly butter a flat baking pan. You’ll probably need two or bake in a couple of batches.
Lay out a flat bread and spoon the filling into the center of a flat bread. Leave an inch around the edge so you can crimp it into a pretty edge. Don’t enclose this, it’s not a pasty.
Sprinkle ⅙ of the blueberries and ⅙ of the walnuts on top of each.
Bake at 375 in a preheated oven for 15 minutes or until the flat bread is crisp on the edges.
Stewed Elk with Cherries
1# elk meat cubed
½ pound bacon, chopped fine
3 medium onions, chopped
½ pound dried cherries, chopped
2 TSP dried thyme
½ C fine grind oat flour
1 TSP flake sea salt
2 C stock (beef, chicken, or veg)
1 C beer
2 TBS cider vinegar
Mix all of the flour, half of the thyme, and half of the salt in a bowl.
Toss the elk with the flour and set aside.
Brown the bacon in an oven safe pot. When it’s nice and crisp, remove the bacon and add the elk.
Brown the elk in bacon fat. When it’s brown on all sides, add the onions. Stir and cook until the onions are starting to turn translucent and get a bit soft.
Add the cherries and cook for a few minutes until the cherries are coated with all the pan goodness.
Add the elk back into the pan.
Add the remainder of the flour, thyme, and salt. Stir well, but gently.
Add the vinegar and stir.
Add half the liquid gently and stir very slowly while adding it. Carefully get all of that goodness off the bottom of the pot to help make a nice thick gravy.
Add the remaining liquid. Put the lid on and bake at 300F for an hour. It’s done when the elk is tender and nearly falling apart.
Don’t let it dry out. If you need to add more liquid, add it in small amounts.
Leek & Pork Wraps
2 large leeks
8 oz ground pork
8 oz ground lamb
½ C finely ground bread crumbs
1 egg
6 oz chopped dried blueberries
2 medium shallots finely chopped
2 TBS plain skyr
½ C finely chopped parsley
3 sage leaves finely chopped
1 mint leaf finely chopped
1 TSP flake sea salt
Cooking liquid:
2 TBS cider vinegar
4 TBS chicken stock
6 oz beer
Prep the leeks:
Cut off the root end and the green parts. Discard.
Carefully slice your leeks the long way, but only half way deep, you want to make leaves or sheets of leek.
Wash them carefully and set aside to dry in a stack with towels to keep them flat.
Filling:
Combine all of the filling ingredients in a bowl. Cover and allow to rest in the fridge for 15 minutes.
Using a spoon or small ice cream scoop, add a scoop to the leek sheet. Fold the little package like a US flag, tucking in all the edges to make a neat triangle.
Place each finished triangle point side up in a baking dish.
When all of the triangles are in the baking dish, add the braising liquid.
Cover and bake at 400 for 30 minutes.
Remove the cover and bake for an additional 10 minutes to reduce the braising liquid.
Fava Surprise
2 C shelled fresh fava beans
2 C shelled fresh peas
4 mint leaves chopped very fine
1 C chopped fresh parsley
1 C finely crumbled feta cheese
2 TBS sour cream
1 TBS Berry Vinegar
1 TSP flake sea salt
Wash and allow to dry all of the veg and herbs. No extra water is needed.
In a small bowl, mix the sour cream, berry vinegar, and salt together with a fork or whisk. You’ll want a little fluffiness.
Toss the plants all together in a bowl.
Add the feta cheese crumbles.
Add the dressing and toss lightly.
Excellent with crisp bread or as a side dish.

TOAST! CRISP, BUTTERY TOAST!
What if I told you open face sandwiches were all the craze?
What is an open face sandwich? It’s basically a one sided sandwich. Just the bottom. Traditionally, the bready portion of the sandwich is crisp bread or toast. Top it with a spread of some kind then add sweet or savory toppings.
A simple sweet open faced sandwich is toasted rye bread with cream cheese spread on it. Top it with fresh blueberries and a drizzle of honey.
A simple savory open face sandwich is that same toasted rye bread and cream cheese, but add a little mustard and chives to the cheese, a few thin slices of lox, and sprinkle a few fresh dill fronds on it.
It’s supposed to be very simple, but sometimes you need a zip! Try the following green spread for a savory treat!
2 C fresh cilantro leaves, no stems
2 C fresh parsley leaves, no stems
1 C fresh chives (garlic is best, but regular works too)
6 sprigs of fresh thyme, strip the leaves
¼ C salted butter
2 TBS bacon fat
1 TBS berry vinegar (can use cider vinegar)
Toss all of the ingredients into a blender or food processor. Taste it to see if any adjustments need to be made. Add a few drops of vinegar, salt, or a little bit of honey to help balance it out. If you want a bit of heat, add freshly grated horseradish.
GOOD FEAST!

Midwest Viking Festival, Green Bay
Midwest Viking Festival Green Bay 2023 is in the books!
It was a GLORIOUS weekend! The weather was perfect, the demonstrations were magnificent, the food was excellent!
I attended as a ceramics demonstrator, not a cook, this weekend. Sadly, I missed the firing schedule so I didn’t have much pottery this weekend to sell, but I did sell a lot of cookbooks. I also don’t tend to take a lot of photos as I’m busy demonstrating. I’ve got to hire a photographer for events to take lots of photos of me and the husband.
Chris The Magnificent was with me this weekend demonstrating Hnefatafl, Fidchell, and 12 Man Morris. Lots of excellent games were played! I’d like to thank Beth & Charles Knutson over at historicgames.com for the game boards! We’ll definitely be stocking those for in person shows!
We arrived on Thursday afternoon to set up, but we don’t have a tent. Yet. It will eventually get ordered, but we don’t have quite enough funds for that. Yet. We’ll probably get a fly and some more period correct tables first. And more sheepskin. Possibly a cowhide.
I’ve got a list of ceramics to build for this coming holiday season:
50 1 pound loom weights
24 tumblers
24 saggy bottom bowls
6 cooking pots with lugs & lids
4 pitchers
12 tiny pots/salt pots/horde pots
12 each of lamps (post, pinch, flat, and cup)
6 big garden gnomes
24 Gnomix small gnomes
Other projects for the holiday season:
Aprons
Grocery bags
Linen kitchen cloths
New recipes
I’m working on the Kindle version of MUVC 2023. I decided to just go back to the beginning and write it all over again in a format that will be acceptable instead of cutting and pasting. That’s going to take a lot of typing. The new book will have both formats coming out at the same time. Possibly in about 18 months. It’s a lot of work to get all that stuff researched, tried out, typed up, and vetted.
I’m still working on the Patreon and member areas for the website. Only so many hours in a day!
GOOD FEAST!

Cooking with Scouts
No, we did not make Girl Scout Cookies with real Girl Scouts. That’s a whole different conversation.
Chris and I spent Saturday with the Scouts teaching some Viking foods, games, and fire management.
I can hear you now: but they learn how to cook and do fire management in scouts! And you would be correct. But these are young folks. Not a lot of experience points. So they did different things within the whole sphere of fire management for baking, general cooking, and frying. I did the frying, though, as it was pretty hot smoky work. We had some damp, punky oak to use.
The troop leader, Austin, picked up a cookbook and decided his troop would be experimenting with some new flavours and textures. In Cold Day Soup, we used coarse mustard and calendula flowers. They did not expect to like it, but were surprised when they did. I did tip the scales a little in my favour by making sure everything had plenty of butter, a bit of extra salt, and just enough vinegar.
Hmm, now I’m having thoughts about a butter beer sauce……
Anyway, for Viking Fried Barley, we switched out the barley for buckwheat. We made a fire and a tripod. Both were things of beauty. I used my new Iron Age pot for frying the buckwheat. The buckwheat did get a big soggy as not all of the water was drained off after cooking. But, a hot iron pan steamed much of it off.
The scouts tried both dishes, and were pleasantly surprised; they liked both of them! The Cold Day Soup disappeared fast, even though it was a hot evening.
Chris did marvels with teaching them how to play Hneftafl! I wanted to play, but we were busy over at the fire with managing and baking.

Crunchy Viking Snacks!
I’m thinking of crunchy snacks. It’s a basic food group: crunchy salty.
I recently tried some roasted edamame as a crunchy snack, and I thought: How can I Viking-ify this? While soybeans are definitely not in the Viking Food Shed (VFS), other beans are.
According to the Ribe Viking Center, Horsebeans were part of the VFS.
Horsebeans (Vicia faba)
Horse beans were an important source of food in the old days. Beans contain a lot of protein, and as they can be dried and kept for years, they were very useful for providing a Viking family with food throughout the long, dark and barren Nordic winter
https://www.ribevikingecenter.dk/en/learn-more/manor-farm-crops.aspx#:~:text=Horsebeans%20(Vicia%20faba),dark%20and%20barren%20Nordic%20winter.
Horse bean, broad bean, and Fava bean are all different names for the same bean.
What are Horsebeans? Horsebean plants, Vicia faba var. equina, are a subspecies of the broad bean proper, also known as Windsor or straight bean. They are a cool-season annual that bears large, thick pods. Inside the pods, the beans are large and flat. This leafy legume has an erect habit with a stiff stem. The leaves look more akin to those of English peas than bean leaves. Small, white blooms are borne in spikelets.
Read more at Gardening Know How: What Are Horsebeans – A Guide To Horsebean Uses And Cultivation https://www.gardeningknowhow.com/edible/vegetables/beans/horsebean-uses-and-cultivation.htm
This seems to be the only bean listed that is eaten podless. So, if it’s typically eaten podless, it can be dried and salted and seasoned with other dried herbs. So, Viking Snacky Snacks! I have found dried fava bean snacks readily available, but they include non-period correct ingredients.
Bada Bean Bada Boom has snacks that include the following: fava beans, sunflower oil, rice flour, and cane sugar. So of that list only the bean is on our menu. Plain dried beans can be a bit mealy, so I’ll roast them. The big question is seasoning before roasting or after?
Peas are also on the menu. I could dry them, roast them, and season them. Dried foods like this would be a nice trail snack as it’s light.
Here’s the process I’m going to use:
2 C dried beans/peas
1 TBS fine grind sea salt
1 TBS melted butter
2 TBS dried slightly ground parsley
I’ll make two batches. Batch A will be just dried beans with the toppings. Batch B will be toppings on then dry roasting in an oven.
Photos and video in later posts.
I’m thinking of crunchy snacks. It’s a basic food group: crunchy salty.
I recently tried some roasted edamame as a crunchy snack, and I thought: How can I Viking-ify this? While soybeans are definitely not in the Viking Food Shed (VFS), other beans are.
According to the Ribe Viking Center, Horsebeans were part of the VFS.
Horsebeans (Vicia faba)
Horse beans were an important source of food in the old days. Beans contain a lot of protein, and as they can be dried and kept for years, they were very useful for providing a Viking family with food throughout the long, dark and barren Nordic winter
Horse bean, broad bean, and Fava bean are all different names for the same bean.
What are Horsebeans? Horsebean plants, Vicia faba var. equina, are a subspecies of the broad bean proper, also known as Windsor or straight bean. They are a cool-season annual that bears large, thick pods. Inside the pods, the beans are large and flat. This leafy legume has an erect habit with a stiff stem. The leaves look more akin to those of English peas than bean leaves. Small, white blooms are borne in spikelets.
Read more at Gardening Know How: What Are Horsebeans – A Guide To Horsebean Uses And Cultivation https://www.gardeningknowhow.com/edible/vegetables/beans/horsebean-uses-and-cultivation.htm
This seems to be the only bean listed that is eaten podless. So, if it’s typically eaten podless, it can be dried and salted and seasoned with other dried herbs. So, Viking Snacky Snacks! I have found dried fava bean snacks readily available, but they include non-period correct ingredients.
Bada Bean Bada Boom has snacks that include the following: fava beans, sunflower oil, rice flour, and cane sugar. So of that list only the bean is on our menu. Plain dried beans can be a bit mealy, so I’ll roast them. The big question is seasoning before roasting or after?
Peas are also on the menu. I could dry them, roast them, and season them. Dried foods like this would be a nice trail snack as it’s light.
Here’s the process I’m going to use:
2 C dried beans/peas
1 TBS fine grind sea salt
1 TBS melted butter
2 TBS dried slightly ground parsley
I’ll make two batches. Batch A will be just dried beans with the toppings. Batch B will be toppings on then dry roasting in an oven.
Photos and video in later posts.

Viking Longhouse Saturday
This weekend's Viking Longhouse event in Wyoming, MN menu:
Pork & Plum Stew (GF, NF)
Walnut & Bacon Grain 2 versions (one is oat and one is wheat)
Green Salad (GF, V, DF)
Sour cream cherry dressing (GF, V)
Blueberry coriander dressing (GF, V)
Viking Fried Oats (V)
Marvelous Millet Salad (V)
Baked Butter Barley(V, NF)
You'll be sampling whole grain wheat, oats, millet, and barley. You'll also be sampling spruce tips, summer savory, marigold, horseradish, and elderberry flowers.
Feel free to bring your own eating utensils and chopping utensils, but if you don't have those things, we will have them. If you want to bring any aprons with you, that would also be helpful for mess mitigation!
Looking forward to seeing you all on Saturday!
GOOD FEAST!

Merchandise is on the way!
Branded merchandise!
We have prototypes for grocery bags and aprons! They will have the logo and Modern Urban Viking Cooking on them. Simple and sweet and oh so washable!
These bags will make your weekly pillage at the grocery or farmer’s market that much easier. An apron you can wash is always helpful to keep your fantastic urban fashions free from kitchen mess!